Determine the SensorPanel's final size in pixels
For optimal design, choose the resolution for your SensorPanel carefully—for example, a common external LCD resolution is 1024 x 600 pixels. This step is crucial as it ensures all graphics, including background images, decorative elements, and gauges, are appropriately scaled and proportioned.
If you change the panel size later, all graphics must be updated to match the new dimensions. To minimize effort, it’s recommended to use large, high-resolution images or, ideally, vector formats, as they are easier to scale and edit without losing quality.
Starting with AIDA64 v7.50, the software supports automatic resizing of images within the SensorPanel Manager. However, maintaining the correct aspect ratio for all images is essential to avoid distortions during resizing.
To Show the Default SensorPanel and Start Designing:
- Launch AIDA64 and open Preferences from the kebab menu.
- Navigate to Hardware Monitoring / SensorPanel page.
- Enable “Show SensorPanel” option, then click Apply.
Once the SensorPanel is visible, you can move it freely on your monitor or between monitors. You can also pin it to a specific display using the “Pin SensorPanel to monitor” option. During the design process, you can keep the default settings shown below:
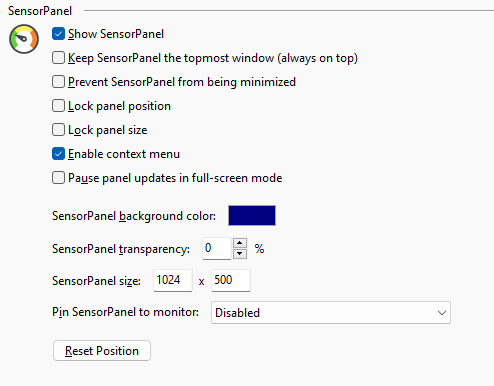
Set the desired SensorPanel size and background color, then click OK.
SensorPanel Manager
To start designing SensorPanels, you need to open the SensorPanel Manager. You can learn more about this dialog in the SensorPanel Manager chapter.
Designing the Panel
Decide what type of data you want to display
You can find the complete list of available options (depending on the computer type and configuration) in the SensorPanel Manager after you click the “New” button.
Make some sketches
Use a classic pen & paper combo if you like. Open your favorite image editing software and start drawing. Collect images and ideas for your work. Use layers so you can easily save the content for your SensorPanel, like the background image. Use the transparent PNG format for decorative images.
Create custom gauges
You need to create 16 image files for each gauge state. You can learn more about designing gauges in the Creating Custom Gauges chapter.
Add the background image
Click on the “New” button. Select Image from the dropdown list and browse for the file you’ve saved. Use transparent PNG images. Keep this background image on the top of the list to prevent other items from hiding under the background.
Add a Simple Sensor item
Click on New and select Simple Sensor item from the list. Select the sensor value you want to display (e.g., CPU Clock). AIDA64 will automatically fill in the label and the default unit (MHz) for you. Customize the text size, font, and color.
Add a more complex Sensor item
Select “Sensor Item” for more control over many options. Define the total width. AIDA64 will indent the label to the left and the value to the right by default. You can set the text size, font name, and shadow parameters. To display shadow, you can enable the “Shadow” checkbox after Label or on the next tab “Value / Unit” to set its visibility individually, along with other properties for the value or unit sections of the item. Apart from the Simple Sensor Item, here it is possible to enable a graphical bar too. On the “Bar” tab, you can enable this feature and set its dimensions and display method.
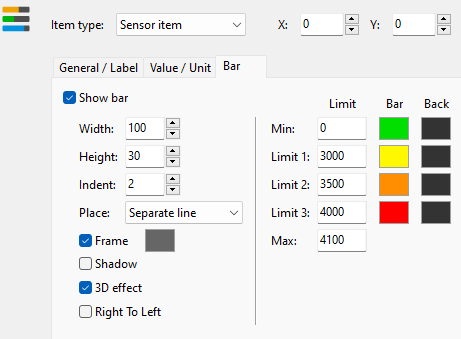
You can display the bar horizontally or vertically by adjusting the Width and Height parameters. If the width is greater than height AIDA64 will display a horizontal bar, in the opposite ratio you can get a vertical layout.
Placement has four options:
- Separate Line: AIDA64 will place the label and value in one line and display the bar under them in a separate line.
- Embedded: Select this if you want to display the text on the bar itself. Make sure to properly adjust the bar and text sizes to achieve the desired look.
- Bar + value + unit: This option places the bar under the label and positions the value and unit fields after it in a single row.
- 3-line: SensorPanel will display each part in a separate row.
You can enable various effects like Frame, Shadow, and 3D effect to adjust the look of your bar. With the Right to Left option, you can flip the bar to the opposite direction. You can also set a value range for the bar; if you set the limits, AIDA64 will display a full-length bar, set its foreground and background color defined in the “Bar” and “Back” field, and use the defined color according to the given sensor value and the Limits you define.
Add decorative images
You can move items up or down in the list to change visibility order using the Move Up or Move Down buttons.
Summary
This guide helps you design a custom SensorPanel using AIDA64, detailing steps from setting up the panel size to adding background images and sensor items. Ensure you use vector or large format images for easier future modifications.